Table of Contents
Rediscovering Engineering Through 3D Printing
Author(s): Louis Ouellet
I didn’t buy a 3D printer to print toys. I bought it to prototype systems.
In early October, I added a BambuLab P1S to my lab. Most people start with a Benchy — a calibration cube, a cable clip, something small and forgiving. I opened FreeCAD and started designing a NAS enclosure from scratch.
Probably not the most subtle first print.
But I wasn’t interested in printing trinkets. I wanted constraints. I wanted tolerances. I wanted airflow questions, structural rigidity concerns, screw alignment problems, and the kind of iterative refinement that forces you to think before you click “print.” I wanted to push engineering muscles I hadn’t used since high school — the ones that make you consider load distribution, clearances, material thickness, and assembly order.
For years, most of what I build has been invisible: servers, scripts, infrastructure diagrams, automation pipelines. Systems that live in racks or in the cloud. With 3D printing, for the first time in a long time, I could design something in the morning and physically hold the result in the evening.
Something functional. Something structural. Something real.
That decision — to start with a NAS enclosure instead of a novelty print — set the tone for everything that followed.
Why I Bought a BambuLab P1S
Before buying anything, I did what I usually do when evaluating new hardware: I researched obsessively.
I watched reviews. I read long-term impressions. I paid attention to failure reports as much as success stories. I also listened to people around me who already owned BambuLab machines and had real-world experience with them. I wasn’t interested in hype — I wanted reliability.
The choice eventually came down to the A1 and the P1S.
The A1 was tempting. It’s capable, more affordable, and perfectly suited for many hobbyists. But the P1S offered two things that aligned better with how I approach projects.
First: filament flexibility. I didn’t want to limit myself to basic PLA prints. I wanted the option to experiment with more demanding materials — stronger plastics, higher temperature filaments, materials that open the door to functional parts rather than decorative ones.
Second: the enclosure.
This was not a production decision. It was a practical one. With two very young daughters at home, I needed something that reduced the risk of curious hands interfering mid-print. An enclosed printer also provides a more stable environment for temperature-sensitive materials and generally feels more controlled and predictable — which matters when you're trying to iterate on designs.
At that stage, I wasn’t thinking about scaling production or running batch jobs overnight.
I was thinking about prototyping.
I wanted a machine that would let me move from CAD to physical object quickly, reliably, and with minimal friction. The P1S felt like the right balance between capability, safety, and long-term flexibility.
My First Print: A NAS Enclosure (Probably a Mistake)
The first unexpected challenge wasn’t the printer.
It was CAD.
I chose FreeCAD for one very specific reason: it is free and open source. There are other “free” CAD tools on the market, but many of them change the rules as soon as you try to monetize your work. Subscription models, revenue percentages, cloud lock‑in — none of that aligned with how I think about ownership and long‑term projects. If I was going to invest time learning a tool, I wanted it to be something I could use indefinitely, without worrying about licensing shifts the moment a project becomes commercial.
So I committed to learning FreeCAD.
It wasn’t straightforward. The workflow is different from more mainstream CAD tools, and parametric modelling requires a shift in thinking. You don’t just draw shapes — you define constraints, relationships, and dependencies. It forced me to slow down and think structurally rather than visually.
Before opening FreeCAD, I started with something simpler: a sketch on paper.
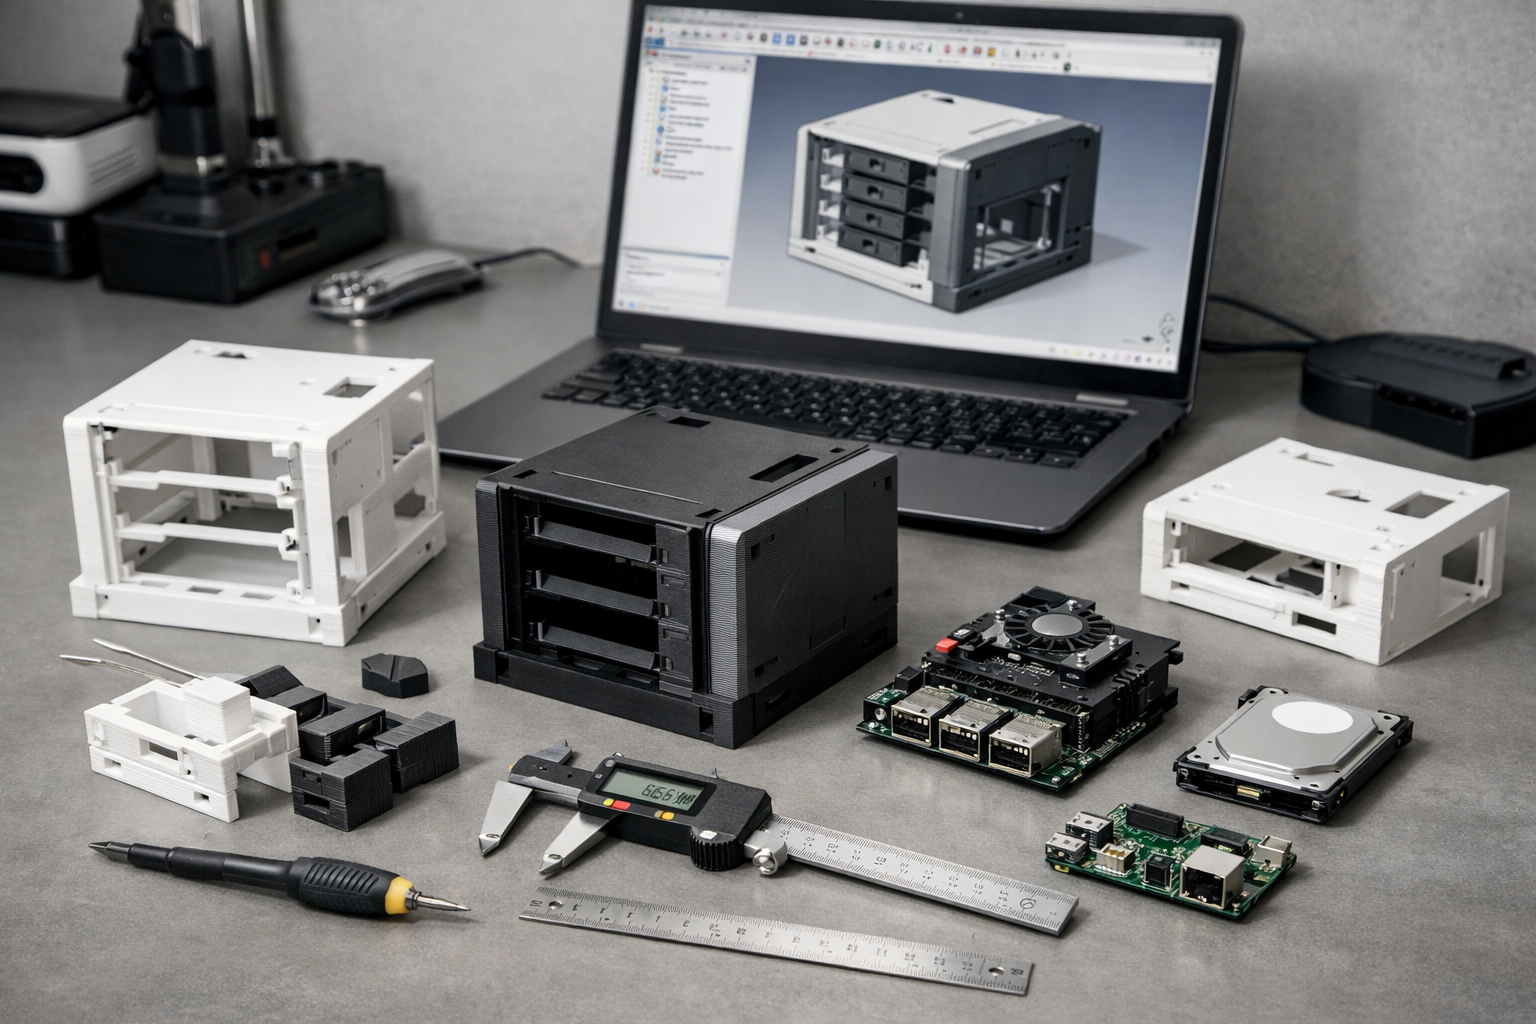
I knew I had hardware to integrate. I had a pair of old 5.25” hot‑swap bays (each holding four 3.5” HDDs), and for the controller I chose a Raspberry Pi 5 paired with a Radxa Penta SATA HAT. That combination dictated spacing, airflow, cable routing, and mounting points.
One of my design goals was to avoid visible mounting screws. I wanted the enclosure to look clean and deliberate — not like a box assembled from the outside in. The solution was to separate structure from aesthetics: an internal frame to mount all components, and an outer shell whose only job was to provide rigidity and visual coherence.
Choosing a NAS enclosure as a first project wasn’t accidental.
I didn’t want to print a fidget toy or a decorative object. I wanted to build something useful. Something I would actually deploy. A NAS made sense: I could use it for backups, media storage, and experimentation. Given my history of tinkering with Raspberry Pis, building around that ecosystem felt natural.
Of course, ambition comes with a learning curve.
Very quickly, I learned that accurate measurement is non‑negotiable in mechanical design. I initially measured components using an old 30 cm ruler I borrowed from my son. That decision alone probably cost me around 500 grams of filament. I printed partial sections of the frame repeatedly, only to discover that tolerances were slightly off every time.
Eventually, I switched to proper tools — including a caliper — and the difference was immediate. Once measurements were precise, the design stabilized. The final enclosure consisted of five printed structural parts, plus the electronics assembly. By the time I printed the final components, most of the trial‑and‑error phase was behind me.
In hindsight, it was an overly ambitious first print.
But it forced me to learn CAD, mechanical tolerances, iterative prototyping, and structural design in one project. And that was exactly the point.
Scaling Production: The Christmas Ornament Marathon
After finishing the NAS enclosure, I found myself facing a very different engineering challenge:
Justifying the printer.
With Christmas approaching, I saw an opportunity. My wife loves redecorating the tree every year with a new theme. It changes constantly — colors, textures, styles. So I had an idea: what if we printed our own ornaments based on whatever theme she chose?
Suddenly, the 3D printer wasn’t just a “lab tool.” It was a seasonal production machine.
I spent days browsing MakerWorld. There are *thousands* of ornament models available. It’s almost suspicious. Either there are a lot of talented designers out there… or a lot of husbands trying to justify the cost of their printer in December.
Probably both.
Once we settled on a theme, the project turned into my first real experience with batch production. Printing one ornament is easy. Printing enough to decorate an entire tree is something else entirely.
This meant planning print times carefully. Some ornaments took hours. Others could be nested and printed in batches. I started thinking in terms of printer uptime, scheduling overnight jobs, and minimizing downtime between prints.
Bed adhesion suddenly mattered a lot more when a failed print meant losing several hours instead of one. I learned to clean the build plate consistently, monitor first layers carefully, and keep maintenance simple but regular.
And perhaps the most interesting milestone: I taught my wife how to start prints from the SD card while I was at work.
At that point, the P1S had officially entered “household appliance” territory.
By the end of the month, we had a fully themed tree decorated with custom printed ornaments. It was fun, slightly obsessive, and unexpectedly educational. What started as a festive side project quietly became my first lesson in small-scale production planning.
Modifying a Raspberry Pi 5 Case
This project didn’t start as a hobby experiment.
It started as a performance complaint.
A few years ago, I built thin clients at work using Raspberry Pi 4 kits. I wrote a small wrapper around FreeRDP to simplify remote connections, packaged everything neatly, and deployed them. They worked. And they kept working — for four or five years.
But over time, the team changed. One of the newer staff members mentioned that the experience felt slow and occasionally laggy, especially during tasks that relied more heavily on graphics acceleration. When we compared it to other thin clients, the main difference became obvious: GPU capability.
The Raspberry Pi 5 had just been released, and one of its most significant upgrades was a much more capable GPU.
That was enough to start the upgrade conversation.
However, moving from the Pi 4 to the Pi 5 isn’t just a board swap. The I/O layout changed. Mounting holes differ. Cases are not compatible. That usually means buying entirely new kits.
Instead, I started thinking differently.
If I was going to upgrade the hardware anyway, why not fix another long-standing issue at the same time: cable management?
The original Pi 4 units were either taped behind monitors or hanging loosely underneath them. Functional — but not elegant. Designing my own case would give me the opportunity to rethink mounting, structure, and aesthetics in one move.
So I started browsing MakerWorld again.
There are countless Raspberry Pi 5 case designs available. Some included VESA mounting support — but prevented you from using an existing VESA mount at the same time. Others felt too basic or fragile. None of them solved the problem exactly the way I envisioned it.
Eventually, I shifted my mindset. If I couldn’t find a model that did everything I needed, I would find one with strong design foundations and modify it.
That’s when I found a design that caught my attention. At first glance, it looked almost like a power tool battery pack — compact, angular, and distinctly “tech.” It had presence.
I printed a test unit and began planning changes.
I exported the parts from the original `.3mf` file and imported them into FreeCAD. Before going any further, though, I checked the licensing. The model was restricted to personal use. Since this upgrade could potentially extend into commercial deployment, I contacted the designer directly. He agreed to allow commercial usage in exchange for a small kickback. I sent him a few dollars and proceeded.
Once I began assembling the original design, several issues surfaced.
Some screw holes were incomplete and required manual drilling. Others were dimensioned for 2.5 mm screws, while I was using 2.6 mm hardware — small difference, noticeable consequences. In a few areas, the plastic split under tension. There were also visual artifacts caused by unnecessary gaps originally intended for ribbon cables, which produced subtle waves on the outer shell.
These weren’t major flaws — but they were opportunities to refine the design.
After correcting tolerances, cleaning up geometry, and improving structural integrity, I turned my attention to mounting.
The goal was clear: create a VESA adapter that could sit between the monitor and an existing mount, without blocking it. After several iterations, I achieved a design that sandwiched cleanly in place while keeping the unit secure and hidden.
Then there was the new physical power button on the Pi 5. The original case didn’t expose it. So I redesigned the rear section to integrate a mechanical push mechanism that presses directly onto the onboard button — clean, simple, and accessible.
With hardware sorted, the software needed to match.
The objective was a true thin-client experience: minimal, focused, and distraction-free. I created a customization script for Debian and Raspberry Pi OS that installs and configures Openbox, applies a custom theme, and sets up a right-click menu with only essential options — start the RDP client, open a browser, launch a terminal, access configuration, or shut down.
Then I revisited my FreeRDP wrapper.
I refined the styling to match the OS theme, added support for branding, and integrated OpenVPN. That way, a user could unplug the thin client from the office, take it home, connect via VPN, and resume work without additional complexity.
What started as a GPU upgrade became a full-stack redesign — hardware, mounting, operating system, and remote access — all aligned into a cohesive thin client platform.
From Hobby to Product Thinking
Up until this point, everything I had printed served a direct purpose.
- The NAS enclosure solved a storage need.
- The Christmas ornaments justified the printer.
- The Raspberry Pi 5 case solved a performance and mounting issue at work.
But somewhere along the way, something shifted.
I stopped thinking in terms of “Can I print this?” and started thinking in terms of “Could this become a product?”
The difference is subtle — but important.
A hobby project only needs to work for me. A product needs to work for someone else. That means clearer assembly steps, fewer fragile tolerances, cleaner part separation, and predictable results. It means thinking about documentation, packaging, repeatability, and user experience.
The NAS enclosure, for example, works. But it is not beginner-friendly. It requires careful alignment, multiple components, and an understanding of how the electronics integrate. If I wanted to offer something like that as a kit, I would need to redesign it with simplicity in mind: fewer screws, better alignment features, perhaps snap-fit elements or guided rails.
The Raspberry Pi case project pushed me even further in that direction.
When I contacted the original designer to negotiate licensing, it forced me to think about intellectual property and value sharing. When I refined tolerances and removed design flaws, I wasn’t just improving a print — I was improving something that could realistically be replicated at scale.
Then there’s the software layer.
My thinOS customization script, Openbox configuration, FreeRDP wrapper, OpenVPN integration — all of that transformed the hardware into a cohesive system. At that point, it wasn’t just a 3D printed case. It was a complete thin-client solution.
And that’s when the idea really started forming.
- What if instead of printing one-off projects, I started designing modular DIY kits?
- What if someone could choose between a fully assembled unit or a build-it-yourself version?
- What if branding could be customized — logos, colors, enclosure variations — without changing the core structure?
That line of thinking changes everything.
It moves the focus from printing objects to designing systems. From solving personal problems to creating repeatable solutions. From hobby experimentation to product architecture.
I’m still in the early stages of exploring this path.
But the mental shift has already happened.
The Idea: DIY Kits & Custom Branding
At this stage, I’m not launching a store.
I’m not quitting my job tomorrow.
But I am paying attention to the way my thinking has evolved.
The idea of DIY kits didn’t appear overnight. It emerged gradually as I worked through real projects. Each time I redesigned something to make assembly cleaner, each time I simplified mounting, each time I adjusted tolerances to reduce friction during installation — I was unconsciously moving toward product thinking.
A kit forces a different mindset.
It asks:
- Can someone else assemble this without frustration?
- Are the steps intuitive?
- Are the parts self-aligning?
- Is the documentation clear?
- Can the design tolerate small user errors?
Those questions are very different from “Does this work for me?”
The thin client project made this especially clear. The moment I added branding options and OpenVPN support, I realized I wasn’t just building hardware — I was designing a platform. Something that could be adapted for different environments, different companies, different visual identities.
That’s where the idea of custom branding started to make sense.
What if a small business wanted thin clients with their logo? What if a maker wanted to resell a pre-configured DIY NAS kit? What if the enclosure could be offered in different colorways or slight design variations without changing the core architecture?
The goal isn’t mass production.
It’s modularity.
Designing systems that can be assembled, adapted, and personalized — while still remaining simple and robust.
For now, this remains an exploration phase. I’m observing which designs are overly complex, which parts could be simplified, and where true value could exist for someone other than myself.
The printer may have started as a hobby tool.
But the mindset behind it is shifting toward something more deliberate.
What Comes Next
For now, nothing drastic changes.
I’ll keep designing. I’ll keep iterating. I’ll keep refining ideas that begin as personal projects.
But I’m approaching them differently.
Each new design is an opportunity to simplify assembly. Each iteration is a chance to reduce friction. Each enclosure is a study in modularity.
I’m paying closer attention to what could be standardized, what could be documented, and what could be offered to someone else without requiring my direct involvement.
There’s no grand announcement here.
Just a direction.
A gradual move from isolated builds to cohesive systems. From “this works” to “this scales.” From hobby experimentation to deliberate design.
The printer still sits in my lab.
But it no longer feels like just a hobby tool.
It feels like the beginning of something I’m quietly building.